Showing posts with label Design. Show all posts

Friday, May 31, 2013

Finally... the kitchen reveal!

Remember way back when when we remodeled our kitchen?  But then I didn't share any photos because Capella was working to get it published in a magazine.  And, I am sure I totally could have since I have approximately five readers of this blog.  ;)  Well, the magazine finally came out so here it is in all of its glory.  Go check out the Summer 2013 issue of Better Homes and Gardens Kitchen + Bath Makeovers!


Wednesday, March 13, 2013

It's the final countdown...

Sorry if like me, you'll now be singing that song all day.  I am officially full term... 37 weeks today.  It's crazy to think of how far we've come, and that we're really oh so very very close to meeting our daughter.  We are "officially" ready.  Her room is as complete as it will be before she comes, though I'd eventually like to add more art, accessories, and pillows for the daybed.  The carseat is installed.  Hospital bags are as packed as they will be until it is time.  Now, we wait.  :)  Work has been crazy and I definitely have some things to wrap up here, but whatever will be will be.

Wonder how many more of these I'll take... 37 weeks to come after tonight.
This weekend, Matt and I did the Junior League's Shamrock n Roll 5K/10K.  To be very clear, we walked the 5K.  And it took us almost an hour.  Ooops.  Hey, that's what happens when you're having major Braxton Hicks the whole time!  :)  I usually run it in about 30 minutes, so it was funny to be lapped twice by many of the 10K runners (they start 15 minutes after the 5K race).  Matt actually has a hairline fracture in his tibia and a sprained MCL thanks to his ski trip and doing a double black bowl (why I ask?  a professional he is not), so he couldn't run either.  Just thankful that his injury doesn't require surgery, because we thought it might be a torn miniscus.  Anywho.

Three of the loves of my life.

Good morning, Atlanta!

This just makes me laugh.  Whoa belly.  Probably doesn't help that I crammed by 37 week belly into a non-maternity, somewhat fitted shirt.  Haha.
After the race and a nice nap, I finished up Greer's room (for now) while Matt was taking care of other things.  I swear, when it comes to nesting in the sense of organizing and throwing things away, Matt is the man.  He's done virtually all of that, but I definitely am more into the cleaning side of things and want everything to be spotless (please note that this is impossible with two large, hairy dogs).


The iPhone photos aren't the best, but they're the best I'm going to do for now.  :)  The colors aren't quite as bright as they appear in the photos (the pink is a salmon/coral pink rather than hot pink, the monogram is a softer aqua than it appears, etc.).  Capella did the base design, sourcing things like the daybed, rug, wall color, etc., and I came in and added the more personal touches that any mom (um, weird... mom) would want to have control over.  The pups were painted by Amy Yeager, and she did an AMAZING job.  There's still some things I'd like to do in there, but that will happen eventually.  I am very happy with the way it turned out.  I find it both calm and playful at the same time, and I hope she will grow into it and love it... and maybe share a room with a little sister or brother some day.  :)  It's a big room!

For 37 weeks pregnant, I'm still feeling pretty good!  I had a couple of weeks of pretty good sleep (this is relative, of course), but now I'm back to sleeping like crap, so I'm pretty tired.  Hoping I get back into a good groove and get some restful sleep before she comes.  I haven't had any swelling (still wearing my wedding rings), and I can still move around as well as could be expected.  I did have a baffling 7 pound weight gain between 34 and 36 weeks that I cannot figure out, but oh well (nurse said I was probably retaining fluid but wouldn't I be swollen if that was the case?).  Maybe it was a fluke... or maybe I need to not be so tempted by sweets.  Paleo what?

Wednesday, January 2, 2013

Free Design Services

If you've been here awhile and seen any of the transformations we've made in our house (just peruse here), they were (almost exclusively) done with the help of Capella Kincheloe.  I never in a million years thought I could afford the services of an interior designer, especially one as talented as Capella who worked under famed designer, Michael Smith (yeah, the Obamas hired him to do the White House interiors... and Capella worked on the project... NBD).  But through IDESIGN, we were able to create a home that we love while sticking to a reasonable budget (I have a Pottery Barn sofa next to a $25 side table from Craig's List... holla!) and not spending a fortune on design fees.

And, you can do the same thing... for FREE!  Capella is giving away a free IDESIGN for any room in your home.  You'd be dumb not to enter... unless you won't use it, in which case, let someone else have a chance!

Happy 2013!

Friday, June 29, 2012

Living Room and Dining Room - How It All Came Together

Warning: This is going to be a long one with as much detail as I can remember!

So, as you saw in this post, after almost three years of living in our home, we finally decorated!  And  boy does it feel good to 1) have it done and 2) be able to walk into your home and enjoy it.  It's frivolous, certainly, and wasn't something that we needed (heck, we do/buy a lot of things we don't need), but I'm glad we did it and it's done!  And, now we're already talking about our next projects.  Haha, I don't know what we'd do if we bought a house that didn't have projects... I guess we'd come up with some just to stay busy.

But, back to the matters at hand.  As I've mentioned time and time again, Capella Kincheloe was the brain child, and we just executed her master plan.  Since I'd worked with Capella before and we'd become friends, she had a good idea of my style and how far she could push it.  We gave her a budget, not a small number but also not too much when considering furnishing three rooms that included some big ticket items.  We splurged in some areas and saved in others.  She put together the plan and idea boards, and we got going.

The basic plan remained the same, but small things evolved along the way like pillows, accessories, paint colors, light fixtures, etc.  If you pin any of these photos, please credit Capella Kincheloe Interior Design!!


Capella Kincheloe Interior Design

Capella Kincheloe Interior Design
Living Room Source List:
Paint - Benjamin Moore (I think we ended up using Sweet Caroline but I will have to check on that and edit as necessary... it's a light minty green)
Sofa - Pottery Barn Landon in Oatmeal Slubby Basketweave
Sofa pillows - ABC Home and Etsy (Suzani from seller Pillowcoversetc)
Ottoman - Crate & Barrel Willow Large Ottoman in Spruce (I don't see it on their website now) with trim added by moi
Woven ottomans - Crate & Barrel Samar Ottoman
Small Gold Side Table - Overstock
Chairs - craigslist
Sofa Table - Scott's Antique Market
Round Scalloped Side Table - craigslist
Lamps - Scott's Antique Market
Lamp Shades - lampsusa.com
Art - from our trip to Greece
Frames above Sofa - Ikea, painted champagne gold
Mirror installation above fireplace - Ikea Lots mirrors, trim painted BM Van Buren Brown (HC-70), decorative tacks where the corners of the mirrors meet (you can't see the tacks in the photos but you can see them in person)
Deer head candelabra - Scott's Antique Market
Accessories - West Elm, Scott's Antique Market, Goodwill, things already owned
Rug - Pottery Barn Malika (already owned)
Built-ins - Custom (Big Bear Construction in Atlanta), painted your basic white and the backs are BM Van Buren Brown, knobs are from Lee Valley

The built-ins were the most expensive thing in this room.  In fact, they were 33% of the total budget for all of the rooms, but they really needed to be redone.  We contemplated trying to retrofit our existing ones, but ultimately decided that we didn't want to do the work necessary for that and wanted to change them a bit more than retrofitting them would allow.  They were built for a mid-90s TV (i.e., deeper than we needed), and we knew we could gain a few extra inches by only making them deep enough for our TV components (DVD player, receiver, etc.).  We also made them wider and had them made to fit our TV perfectly, as Matt said we'd never get a bigger TV for that room (I think we have a 50").

The big DIY stuff was in this room.  When purchased, the lamps were originally tarnished brass or copper or something.  We cleaned them up, spray painted them keeping a little band of the brass showing for fun, put in new electrical components, and got the chocolate brown lamp shades.  The deer head candelabra is some sort of rough, heavy (dull) metal (maybe iron?), so I also cleaned that up and spray painted it.  I added the trim to the ottoman to make it a little more custom.  I spray painted the Ikea frames, and Matt and I hung them (some work trying to get 8 lined up perfectly... plus you have to put the hanging hardware on them yourself).  Capella doctored the photos in the frames to make them a bit more artsy (all ours from top L-R: Maddie, sunset in Santorini, our feet in the Pacific, walking down the aisle; bottom L-R: church where we were married, an engagement photo, Max, tree in a vineyard in Sonoma).  It will be fun to be able to change the photos out as we add to our family (the photos are 16x20).  We installed the mirrors over the fireplace (after a failed attempt to antique them) and trimmed them out (probably at a total cost of less than $60).  It might not sound like a lot of work, but as you know if you're a DIYer... these things take awhile, especially when you have full time jobs and other responsibilities too!

Now, onto the dining room...


Capella Kincheloe Interior Design

Capella Kincheloe Interior Design

Capella Kincheloe Interior Design

Capella Kincheloe Interior Design
(I like this last shot because you can see into the LR... if you were looking straight through that doorway, you'd be staring through the kitchen to the back door out to our screened-in patio... probably the next sprucing up project.)

Dining Room Source List:
Paint - BM Pacific Ocean Blue (this scared the crap out of me, but I trusted Capella and I'm glad I did)
Table - craigslist
Chairs - craigslist (from a restaurant furniture liquidation - $220 for 8!!!)
Shelves - French Shopkeeper Shelves from Wisteria
Rug - Crate and Barrel
Light fixture - Savoy House Forum Four Light Pendant in Gold Dust (purchased from Wayfair.com)
Curtains - West Elm Luxe Window Panels in Ivory
Accessories - Ikea, Crate and Barrel, Pottery Barn, Container Store, things I already owned
Mirror - already owned (Ikea)
Frames - Pottery Barn
Art - Etsy (seller RSJakeGraphics)
Corbels (used as candle sconces) - http://crown-molding.com/Corbel-C8030-mantel-corbels.aspx

This room didn't require as much DIY.  We hung the mirror, curtains, light fixture, art, etc., which of course all takes time, but I didn't have to "create" anything for this room.  It came together pretty easily.  This room is small (11.5'x11.5'), so we had to play around with it to make it seat 6-8.  You can seat 6 comfortably at the table (and that's how we have it set up), but it's pretty small.  Eight is doable, but would be tight and would have to be a buffet set up because there wouldn't be any room for food on the table.  The shelves double as a bar, and we would use that to set up food if we entertained for a group.  The nice thing is that there's enough room for a small card table, so we could have a kids table in the future and all eat together.

The kitchen will be kept under wraps until after the magazine comes out, which probably won't be until Spring 2013.  The shoot went great and it was really fun to see the editor and photographer in action.  I can't wait to see the pictures!!  (And, I still can't believe my kitchen will be in a magazine... so funny.)

Monday, May 21, 2012

Published (& the house transformation of late 2011/early 2012)

Enough depressingness.  Pardon me and the moment of self pity I was having last week.  So unbecoming, but it's where I was at, so whatevs.  Just keeping it real.

In other real news, you may remember that we did some major kitchen remodeling and also decorated our living room and dining room, thanks to the incomparable Capella Kincheloe.  The reason I have not shared any after photos (unless you're a facebook friend) is because we were trying to get a room (or rooms) published.  Well, the fine folks at BHG's Real Life Kitchens & Baths decided to use our kitchen in their next publication.  I don't have all of the details yet, but we miiiiiiiight be on the cover of the winter issue, and they are coming to shoot the kitchen in late June.  So, I can't share any kitchen photos, but here are a few living room and dining room shots.  These photos were shot by my very good friend and ultra talented photographer, Jenny.  Pretty amazing, especially considering she has no experience shooting interiors!

(I am only posting photos Capella has on her website until I get the all clear from her to post more... and I'll tell you a secret, she has two shots of my kitchen on her website... it's the photo you'll see before the ones below.  The photos were taken before my fabulous Roman shades arrived and were installed, but they definitely finish out the kitchen wonderfully.)


My kitchen might be here... crazy.

Dining room before

 
Living room before

 
Living room before

More old house posts here, here, here, here, and here.  It's been quite the transformation!  I will do a post eventually with sources, what we did (a fair amount of DIY, per the usual), etc.  Suffice it to say, we are happy to have it done and are enjoying our beautiful home!

Tuesday, February 14, 2012

Loving Today

Yeah, yeah... besides my husband, dogs, family, friends and all that mushy stuff... this.


A little sneak peek of some of the things we've been up to in the living room.  I failed miserably at antiquing mirrors (side note: Ikea Lots mirrors are antique proof), so we just went with a clean version.  Five wide by five tall and framed out with 1-3/8" trim creates an inexpensive mirror installation above the fireplace that has a HUGE (literally and figuratively) impact.  It was also easy and quick... maybe took us 2-3 hours total to put up the mirrors, cut the trim, paint the trim, install the trim, then wood putty/touch up paint.  Stay tuned for more...

{happy dance... I love my house!}

Thursday, January 5, 2012

Just What I Needed

Last night I "prayed" (really, more like just putting it out into the world, because this is not something I felt the need to put on God) that we would get our appraisal back (the new one) and it would be good (i.e., what we needed... good would be to say that everything we've spent on our house has tacked on to what we paid for it).  :)

BAM!  Woke up this morning, checked the ol' e-mail and there it is... do I open it and possibly ruin my day?  But, if it's good, then I'll have a super day.  When I saw the appraised value, the heavens opened and a light shone down upon me and the choir of angels in my head began singing, "Hallelujah!"  Now, we can refinance!  {happy dance}

Plus, next week our new built-ins are going in, we just got a quote on painting that is excellent, Capella Kincheloe is escorting me to Scott's Antique Market to get all kinds of fun stuff for her beautiful design for our home, and I'm confident we can have it all put together by mid-February (with some hard work and $, but it can be done).  Things are looking up.  :)

Tuesday, October 4, 2011

Visual Interest

I'm going to wait until it's completely done, rug in, curtains hung, etc. before posting any more photos BUT I had to let you see a little sneak peek of what kept us busy all weekend.  Tile saw + Kristin = BFF.  It's not grouted or caulked yet, but isn't she beautiful?


P.S.  On a much less superficial note, I went to the hospital last night to see Jenn, Matt and sweet Davis.  He is hanging in there... such a strong little guy.  No news is good news, and while as of yesterday, his heart "looked" the same on the echo, his vitals were very good.  Praying that the worst is over and that God heals him completely.

Wednesday, April 20, 2011

Old is the New New

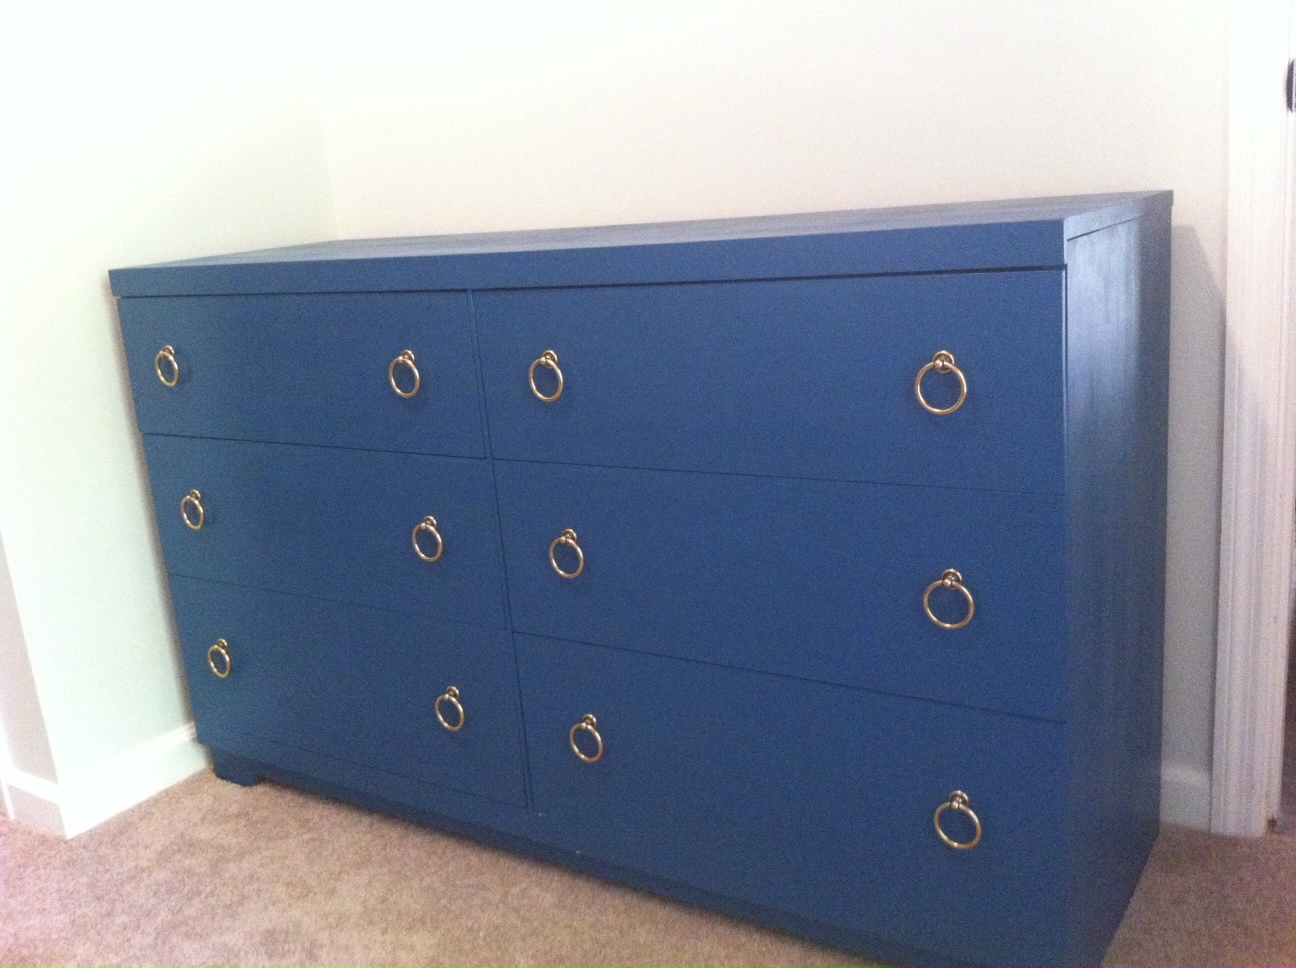
So, maybe it's not the new new... maybe old is the old new.  But, I like old.  And, I like new.  So, I took some old and new and voila, a masterpiece new dresser!  (Please pardon the iPhone pictures... I will take some good ones once I have it "staged" so you can see it in the room.)

Exhibit A: an authentic mid-century (we think late 40's/early 50's) Broyhill dresser

The dresser has dovetailed drawers that are also lined in cedar, is solid wood with a thick wood veneer (not like you see today) and all the drawers worked great.  It had some minor damage, including stains and chips and cracks in the veneer, but no matter since I was painting it anyway.  Oh, and I got it off Craig's list.


The first thing I did was remove the drawer hardware (which I'm going to sell on eBay... holler if you're interested in some authentic mid-century drawer pulls... I have 12) and sand all of the surfaces with a hand-sander and 150-grit sandpaper (I believe... may have been a little lower grit than that).  I just wanted to rough it up a bit and remove any stickiness or debris from the dresser.  Then I cleaned it very well to remove all of the dust from sanding and many, many years of use (the amount of regular dust and wood dust from sliding the drawers inside of that thing was impressive).  

Once it was clean, I used Elmer's wood filler to fill in the extra holes left by the old drawer hardware (they used two screws and the ring pulls I got only needed one), the "cracks" down the middle of each dresser since I wanted a flat front, and any imperfections in the veneer.  Let it dry, sand, apply more wood filler as needed, rinse and repeat.  Once I felt like everything was smooth (and fully dry), I began priming using Zinsser oil based primer, since I knew it would stick to the veneer.  I added Penetrol to the primer to help it go on smoothly and used a combination of a good Purdy brush and foam roller.  I still had issues with it going on smoothly, but I sanded with 220-grit sand paper in between coats.

Once the primer was dry, I began painting.  I used Benjamin Moore slate teal in semi gloss latex, as it was a close match to the blue I wanted to pull from the zig-zag fabric on my grandma's old cane back chairs and it also compliments the light blue-grays in the room.  I actually had them mix it at 125% saturation, because I wanted it to be a little richer than the swatch.  There was a more navy blue color above it on the swatch (I think it was called twilight), and I wanted to do 50/50 of those colors, but that wasn't possible without buying a quart of each, which was just too much paint.  I should have gotten Floetrol to add to to paint, as I had a lot of issues getting the paint to go on smoothly.  Latex paint just dries too quickly, so it was tough.  Unfortunately, I had to give up here, because I had a friend coming in town and couldn't spend any more time on it.

Exhibit B: the new old dresser with burnished bronze ring pulls from Lee Valley


At some point, I will sand everything back down with fine sand paper, add Floetrol to my paint and try to get a smooth coat, but it's actually not noticeable in the room (outside, the brush strokes were glaring).  After that, I will add a low/no-VOC clear coat, such as Acrylacq to give it some sheen and wipe-able protection (and so I can bring it back in the room and not suffer through the fumes, even though I secretly like the way they smell).  Although the above picture is not a very accurate depiction of the color, you get the idea.  More pictures when it's really done!

Tuesday, November 23, 2010

Ask a Designer

My friend, and interior designer extraordinaire, Capella Kincheloe has gone and done it again. In addition to her amazing IDESIGN service that is perfect for people like Matt and me who love to DIY but don't have the best eye for design, she has started an Atlanta Meetup group called "Ask a Designer". This is an awesome, low-cost way to ask all of your design questions without having to pay a designer by the hour! I encourage all of you metro Atlanta residents to take advantage of this, as like IDESIGN, this is an unmatched opportunity to have access to someone with her level of talent and experience at such an affordable price. Check out the before and after photos of our master bedroom IDESIGN. Amazing right? She's also helped us with a space plan and layout for our kitchen remodel, as we ran into some hiccups with taking out the wall we wanted to remove. Stay tuned as that will hopefully be happening in early 2011. And, we are definitely utilizing Capella's talent for our living room and dining room, after the kitchen!

Tuesday, July 27, 2010

DIY

A little link love over to our fabulous interior designer's blog for a post on our DIY re-do of the desk and chairs! I thought I saved a before picture of the desk but no such luck. It was beat up and stained with a lighter and redder (is that a word?) brown. We (and by we, I mean Matt) stained it dark walnut, which we apparently have a penchant for since it's the same color as our hardwoods. The chairs were all me, and I'm available for hire. ;) Go check it out.

Wednesday, July 7, 2010

Master Bedroom Breakdown

First, Capella has posted a few pics on her blog and website. This is a more accurate representation of the color. It looks a little more green in my pictures in the post below than it does in "real life".


So, above is basically the one page I got from Capella. There are few things missing from here to make it a bit cleaner to post, and of course, she also sent a source list, paint colors, fabrics, and room layout. We used *most* of what Capella recommended. Below I will source each item and whether or not it was included in the plan.

Wall color - Pearl Gray by Benjamin Moore
Ceiling color - Mountainscape by Benjamin Moore
Side tables - Wisteria.com
Bedside lamps - Arteriors Leopard Silveria glass lamps
Headboard - custom by New Again Upholstery
Headboard, bedskirt and pillow fabric - Lewis & Sheron (don't remember the name but it's a grayish blue linen type fabric)
Bedskirt - custom by moi
Tray and box on side tables, pillow on settee - West Elm (not included in IDESIGN but picked out by Capella)
Settee - Nate Berkus on HSN.com
Duvet - Pottery Barn (Matt did not like the quilt in the IDESIGN)
Throw on settee, baskets and other accessories - Home Goods
Large wall art - Ballard Designs
Smaller wall art - frames and mats from Sam Flax, larger print from art.com, smaller print from 20x200, personal photo (the art she sourced was from One Kings Lane and I waited too long to purchase)
Desk - Craig's List, refinished by my handy husband
Chairs - passed on from my grandma, Memere - painted BM Castleton Mist and recovered in fabric from L&S by moi (loved the Ballard chair Capella recommended in IDESIGN and would have used it if these weren't just sitting begging for a makeover)
Floor mirror - already mine from Ballard
Shades - bamboo from Home Deport (I couldn't make up my mind on the beautiful, fabric shades Capella picked out so I opted to save that money and go with bamboo; definitely a possibility to upgrade at some point)

So, I've said it before and I'll say it again... Capella was awesome. I really couldn't picture how it was all going to turn out, but I trusted her and that was the best decision I could make. I also have to admit... I had a little more help than the typical IDESIGN customer, because I was her first client to do this. However, it shows me how truly invaluable an interior designer can be. My brain just doesn't work that way. I will definitely do IDESIGN again in the future and then pay her hourly for the extra help be it selecting other options for something or staging the room. I would also consider her full design services if it makes sense... as of now, we like to DIY so this is the better way for us to go.

Wednesday, June 30, 2010

I LOVE MY ROOM!

LOVE!

Please pardon the poor quality of these photos, as they were taken with my iPhone (and no flash). Also, this was after Capella left, so the other bedside lamp is missing (the warehouse apparently cannot read an order and only shipped one, so she found one locally and borrowed it from the store for the shoot).


I know I've already said it, but I truly cannot say enough good things about Capella's talent. I honestly could not have made my room look anywhere close to as good as it looks without her help. There are still a few things I'm working on... a dresser for the sitting room (we're using our current one there now, but want to find something old and paint it... maybe a Dorothy Draper), a lamp for the desk (she brought one for the shoot), and the big mirror above the fireplace is actually from our living room but we brought it in for the pictures because we are eventually going to mount a TV up there.

I will make another post with a little more on the experience of working with Capella, what I would recommend if you're interested in her services (if you're local vs out of town), some of the design specifications and how we adapted them for ourselves (basically what we did and didn't do), etc. Needless to say, I look forward to doing our next room together (probably the dining room after we do the kitchen). Also, the professional photos should be up on Capella's site some time next week.

Oh, and just a reminder of the ugly before... so glad we crossed another project off the list, and in my opinion, it's the best one yet!